Fly Fishing Tips
Op deze
pagina's plaatsen wij regelmatig tips & tricks: filmpjes,
uitleg, knopen en diverse handigheidjes op het gebied van het
vliegvissen. Heb even geduld, want het
laden van deze pagina met zoveel filmpjes duurt wat
langer.
Nuttige tips van Lindsay voor het vissen op de forelvijver
Een super leader-vliegenlijn verbinding...
Er zijn veel manieren om je leader te bevestigen aan een
vliegenlijn, dit is wel een hele goede en sterke verbinding.
Makkelijk aan de waterkant als je moet wisselen en bovendien strekt
de leader zich mooi en is het een slanke verbinding door de
hengel-ogen.
Non slip loop knot
Supersterke knoop om je vlieg ruimte te geven om mooi te zwemmen.
Perfection Loop
Een essentiele knoop als je een lus in lus verbinding wilt maken met je leader aan het lusje van je vliegenlijn.
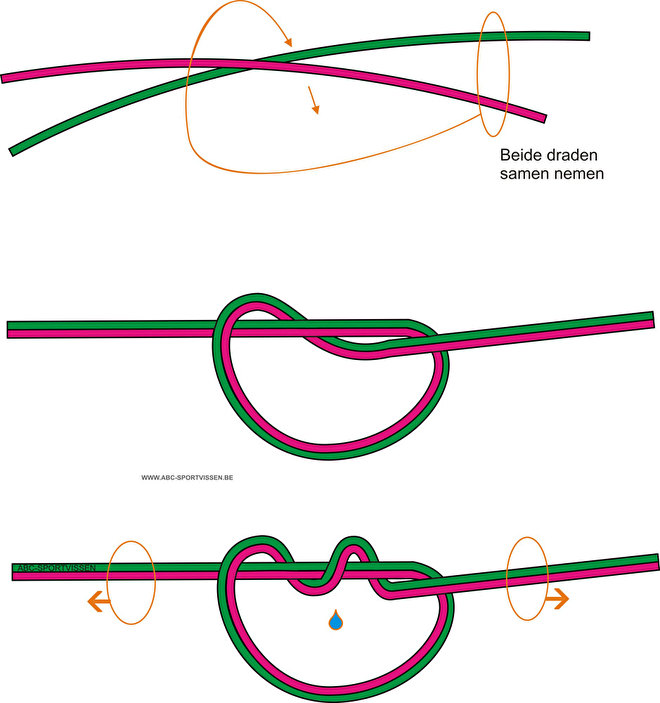
Waterknoop/Chirurgenknoop
Een zeer gemakkelijk te leggen, sterke knoop (sterker dan de
bloedknoop).
Nadeel: kan slechts in het eind van een lijn gelegd
worden. Ideaal voor het zelf knopen van leaders en om twee
lijnen aan elkaar te verbinden. Hoe dunner de lijn, des te vaker
doorhalen. Bij 25/00 is drie keer genoeg.
Dubbele Grinner
Handige knoop om twee lijnen aan elkaar te verbinden zonder helemaal door te hoeven halen.

....een paar essentiele knopen!
Arbor Knot
Hoe maak je nou je backing vast aan je flyreel? Heel simpel..kijk maar.
Nail Knot
Een wereldberoemde knoop waarmee je twee lijnen aan elkaar maakt. Je kunt deze ook gebruiken om je leader te bevestigen aan je vliegenlijn als er geen lusje aan zit. In dit geval maakt deze mijnheer de backing vast aan de vliegenlijn. En hij doet dat met een paar aardige extra trucjes. Je kunt natuurlijk ook een nail knot tool gebruiken.
Orvis tippet knot
Vliegenlijnen opspoelen
Om te voorkomen dat je dure vliegenlijnen gaan kringelen gebruik ik vaak vliegerlijnspoelen. Vervolgens berg ik de lijnen donker op dan gaan ze zeker langer mee. Tevens kun je met dit systeem snel van lijn wisselen op elke willekeurige reel. Zeker als je met een lus in lus verbinding met je backing werkt. Eigenlijk heb je ook helemaal geen dure reservespoelen voor je reels meer nodig. Een handige en goedkope oplossing dus.
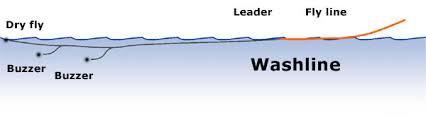
Waslijntje
Er werd mij gevraagd hoe vis jij die diawl bach's dan net onder de oppervlakte? Dat doe ik op deze manier met een drijvende vlieg op de punt. Met diawl bach's gebruik ik een foam-vlieg die niet hoeft stil te liggen zoals een droge vlieg. Dat kan een grote tor zijn of een booby of drijvende blob. in ieder geval iets met flink drijfvermogen. Op de zijlijntjes heb je dan de Diawl bach's.
Buzzers in een lusje
Het is heel slim om een lusje te gebruiken wanneer je strreamers en nimfen aan je tippet knoopt. Ze bewegen veel vrijer in het water en dat geeft net een natuurlijker effect. Op moeilijke dagen kan dat dan ook net het verschil zijn in vangen of niet vangen. En behalve streamers en nimfjes kun je vooral ook goed buzzers vissen op deze manier.
Vissen met een buzzer onder een beetverklikkertje
Hans Bock legt uit hoe je met een buzzer succesvol vist op de forelvijvers.
Buzzer set-ups
Hier een leuke illustratie van hoe je verschillende buzzer set ups kunt maken die onder diverse omstandigheden effectief kunnen zijn.
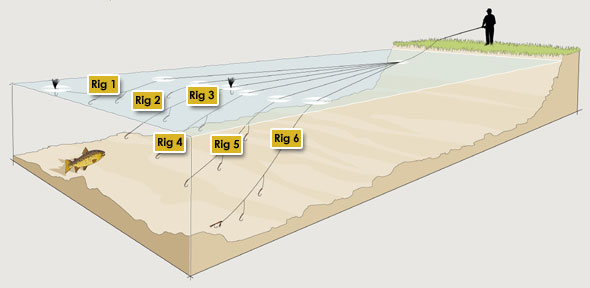
buzzer rigs
Rig 1 - Two nymphs on droppers with Suspender Buzzer/dry fly on point (copolymer leader)
Rig 2 - Single nymph on greased leader (copolymer leader)
Rig 3 - Dry on top dropper with two nymphs below (copolymer leader)
Rig 4 - Two nymphs only (copolymer/fluorocarbon leader)
Rig 5 - Three nymph set-up (fluorocarbon leader) sometimes with sinking leader
Rig 6 - Three nymph set-up with flies closer together (fluorocarbon leader) and sinking leader
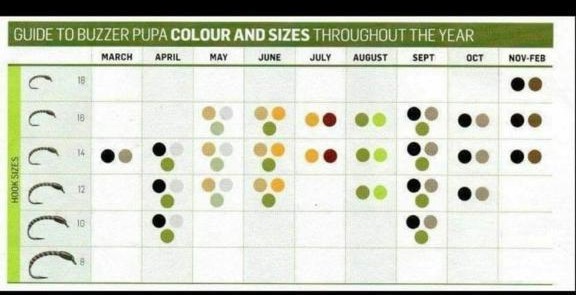
Buzzer Chart
Dit is een handig kaartje als je wil weten met welk formaat en kleur buzzer je het beste kunt vissen gedurende het seizoen.
Leader in je vliegenlijn verlijmen.
Mensen vragen mij regelmatig hoe ik de leader zo mooi in de vliegenlijn verlijm. Deze mijnheer legt het even haarfijn uit. Het is een schitterende verbinding als je met lange leaders vist. Aan het einde van de dril kun je zonder problemen je leader door het topoog indraaien en de vis landen. Bovendien is het als je het goed doet een supersterke verbinding. Ik heb zelden problemen gehad en ik gebruik deze verbinding al jaren.
Snel lusje maken aan je zinklijn
Deze 'kerel' laat je zien hoe je eenvoudig toch een aardig lusje kan maken aan je zinklijn met behulp van een naaldknoop en een stevig braided, kevlar of supersterk draad. Een beetje UV Knot Sense erop en je bent klaar!
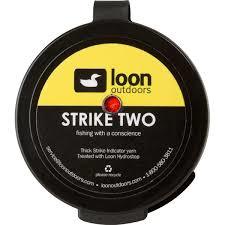
Loon Strike Two
Tijdens mijn vele uren reservoirvissen met buzzers en dergelijke patronen heb ik allerlei beetverklikkers geprobeerd. Dit is verreweg de beste! Het is licht, dus werpt makkelijk. Het drijft als een kurk. Je bevestigd het gemakkelijk aan je leader. Het blijft netjes zitten. En het allerbelangrijkste, het is ontzettend goed zichtbaar en registreert de kleinste aanbeet.
Je hebt eigenlijk maar een klein plukje nodig. Dus dit relatief dure potje met 15 cm superyarn gaat jaren mee. Neem je deze versie...de Strike Two, dan kun je het plukje nog halveren ook. De meeste rigs met 2 buzzers zijn dan nog goed te vissen. Bijkomend voordeel is dan ook dat je verklikker door je topoog en andere ogen van de hengel kan. Je laat de yarn gewoon op je leader zitten voor de volgende keer. Je kunt een plukje dan ook heel lang hergebruiken. Het is leverbaar in 2 uitstekend zichtbare kleuren; fluo orange en fluo yellow.
Vissen met Buzzers II
Vissen met buzzers zoals de Engelsen dat vaak doen vanuit de boot. Kampioen Leigh Pond legt het prima uit. Dit zijn twee zeer succesvolle methoden. Doe er je voordeel mee.
Vissen op forel op een meer of reservoir
Deze mijnheer legt uitvoerig en duidelijk uit hoe je gaandeweg de dag het vissen op forel kunt aanpakken. Je leert diverse technieken die effectief kunnen zijn. Echt een aanrader voor beginners.
Handling runningline
Een situatie die je als vliegvisser op zicht of bijvoorbeeld als vliegvisser op zeeforel/bonefish etc. veel meemaakt. Dit is de oplossing zonder de boel in de knoop te hebben op het moment supreme...
Czech Nymph?
Of heet het French Nymphing?...nou ja hoe dan ook, effectief is het wel. Afgelopen zomer ben ik een dag met Roman Heimlich op stap geweest. Roman is een van de mannen van het Tsjechische nationale team. Het was een geweldige dag. Roman is geen betweterige omhooggevallen wedstrijdvisser. Hij is een bescheiden aardige jongen die exact weet wat hij aan het doen is. Hij heeft geen geheimen en vertelt het je graag. Roman is naast een topvisser een geweldige gids. Hij is alleen maar met jou bezig. Als je een keer die kant op wilt...laat het me weten dan krijg je zijn gegevens. Je kunt hem bellen/mailen voor een onvergetelijke dag aan de Vltava.
Hier 2 filmpjes die het Czech/French-Nimfen redelijk goed uitleggen....de eerste zoals de Tsjechen vissen zonder vliegenlijn maar met 8m Camofil of een andere dikke monoleader direct aan de backing geknoopt. Daaraan dan weer een Czech Nimf-indicator en dan de tippet met 2 of 3 vliegen.
Het alternatief is met een gewone vliegenlijn, maar dan wel zo dat de getaperde leader in de vliegenlijn is gelijmd. Daaraan een indicator en dan de rig met 2 of 3 vliegen. Kan ook en is vast niet minder effectief. Hoewel...De Tsjechen winnen meestal.
Methode 1
Methode 2
2 leader voorbeelden Euro-nymphing
Hier zie je een tweetal voorbeelden van hoe je de euro-nymphing leader op kunt zetten. In plaats van het dure Cortland Indicator materiaal in de video, gebruik ikzelf het veel voordeliger Asso strike indicator mono.
Lusje aan je vliegenlijn maken
Een lusje aan je vliegenlijn is een heel handige verbinding als je snel van leader wilt kunnen wisselen. Maar hoe doe je dat nou met zo'n krimpkous?
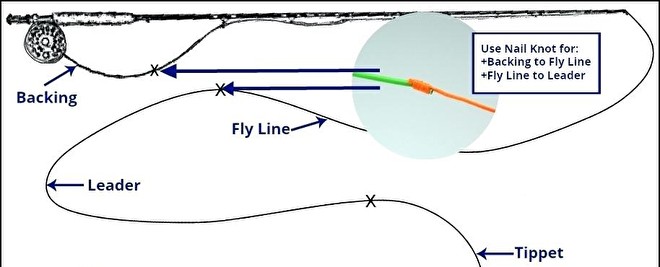
THE BASIC CONNECTIONS
The following diagram shows the basic fly fishing line connections and knots:
THE ARBOR KNOT, TO CONNECT THE REEL TO THE BACKING
We strongly recommend you attach your fly line to backing, which goes on the reel spool first. Backing comes in different strengths, usually 20 lbs or 30 lbs. There are two ways to determine the right amount of backing to use. You can wind the line on first, followed by enough backing to fill within 1/8 to 3/16 inch from the edge of the spool. Then reverse the process. To avoid this extra step, many manufacturers include a chart with their reels that tells the proper amount of backing.
There are several good reasons for using backing. It lets your line form larger coils on the reel, which dramatically reduces line memory and also helps you wind your line more quickly. And, when you’re playing big fish, the extra backing may save that fish when it makes a long run.
To assemble your tackle, many angers first fasten the fly reel to the reel seat of the rod. With the reel in place, the rod handle and stripper guide will help you wind on components more easily and efficiently. Pull off several feet of line from a spool of backing. Pass the tag end of the backing through the line guide closest to the rod handle. The most basic connection – anchoring backing to the reel arbor (or spool center) – uses the Arbor Knot.
Tie an overhand knot on the backing end and tighten it. Insert this knotted end between the reel foot and the arbor, circle the arbor, and pull the knotted end out so it’s next to the standing part of the backing. Tie a second overhand knot with the tag end around the standing part of the backing.
Holding the reel in your left hand, pull on the standing part of the backing with your right hand, snugging the knots against the arbor. Trip the tag end, and wind the backing onto your reel.
Make sure the line feeds from the guide on the rod to the bottom of the reel. If not, you’re winding in the wrong direction. Make tight, smooth layers across the arbor as you wind on the proper amount of backing.
The next step is attaching the line to the backing and winding it onto the spool.
THE ALBRIGHT KNOT, TO CONNECT THE BACKING TO THE FLY LINE
Use the Albright Knot for tying backing to fly line.
Unwind 2-3 feet of fly line from the plastic spool it came on (make sure you unwind the end marked “this end to reel”).Start by doubling back a couple of inches of fly line and hold the loop with your left thumb and forefinger. From the right, insert about 10 inches of the backing through the fly line loop.
While holding the loop, pinch the backing between your left thumb and forefinger, and use your right hand to wrap the backing tag end back over both strands of the fly line and the backing.Start next to your fingers and working toward the loop end, make 10 to 12 fairly tight wraps.
Push the tag end of the backing back through the loop on the side opposite where it originally entered so both backing strands exit on the same side of the loop. Pull on the standing part of the backing to remove the loop you where holding in your left hand. Pull both ends of the fly line backing.
Pull gently on both ends of the fly line loop with your left hand; squeeze the knot with the fingers of your right hand and work it down to the loop end, but not off the fly line. Moisten the knot. Hold the standing and tag fly line strands in your left hand, and the tag and standing backing strands in your right hand. Pull as tight as possible. Clip off the tag end of the fly line and the backing.
You’re now ready to wind the line over the backing onto the spool.
Here’s where a friend can help by inserting a pencil through the hole in the line spool and holding it while you wind the line onto the reel spool under slight tension. Once the line is fully transferred to the reel spool, you should have approximately 3/16 inches between the line and the outside rim of the spool. As a final touch, put the pressure sensitive label, “Fly Line Marker,” on the reel spool so you can always tell what line is on that spool.
THE NAIL KNOT, TO CONNECT THE FLY LINE TO THE LEADER
You may use the Albright Knot for the leader to line or a slightly more complicated, Nail Knot, can be used for a smoother finish. The Nail Knot requires a small diameter tube, such as the barrel of a ballpoint pen, a nail knot tool, or other similar object about twice the diameter of the fly line. Using a small diameter tube makes the knot easier to tie.
Hold the tube and the end of the fly line with your left thumb and forefinger so about two inches of the fly line and the tube sticks out to the right.
With your right hand, form a 2” loop in the heavier end of your leader. Pinch down and hold this loop with your left thumb and forefinger next to the tube and fly line.Use your right hand to grasp the short leg of the leader loop and make 5 snug wraps over the tube and fly line. These wraps should butt against each other, and be at least ½” to ¾” from the end of the fly line.Then slide your left thumb and forefinger forward to hold the wraps so they don’t unwind while you work the tag end of the leader butt through the tube from right to left. Carefully remove the tube by sliding it to the left.S emi-tighten the knot by pulling gently on both ends of the leader. Don’t pull on the fly line!
Moisten the knot area, inspect the knot wraps for smoothness, and tighten the knot by simultaneously pulling on both ends of the leader so it “bites” into the fly line. Then pull hard on the fly line and leader to “seat” the knot. Finally trim the leader tag end and the fly line end.
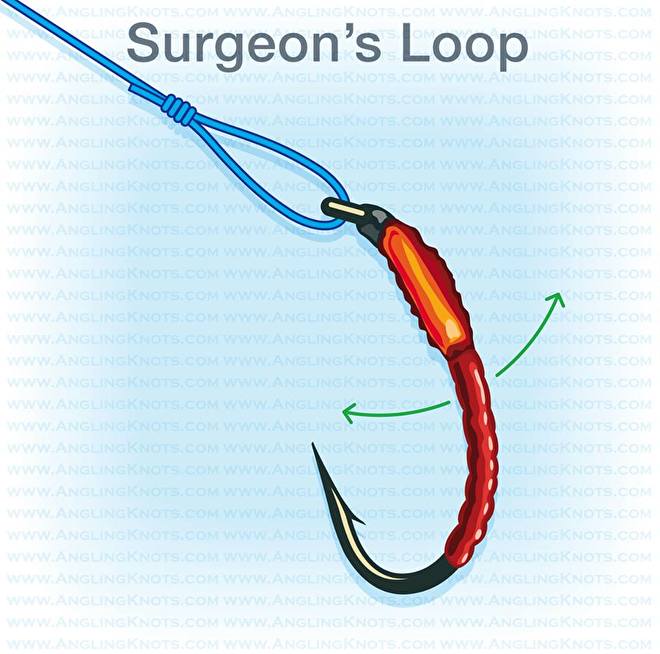
THE DOUBLE SURGEON’S KNOT, TO CONNECT THE LEADER TO THE TIPPET
The easiest and fastest knot for attaching the tippet to the leader in all kinds of conditions is the Double Surgeon’s Knot.
The Double Surgeon’s Knot requires the leader and tippet to be placed side-by-side so they overlap (for about 6”) with ends facing in opposite directions.Pinch the standing leader and tippet tag end with the left thumb and forefinger and use the right hand to tie an overhand knot with the leader tag end and the tippet.
The entire length of the tippet must be passed completely through the overhand knot loop; even tough the leader tag end is only about 5” long. Don’t tighten the completed overhand knot!
Grasp the completed loop with the left hand and make another pass through the same overhand knot, passing the full length of the tippet and the leader tag end through a second time.
Draw the loop down by simultaneously pulling on leader and tippet. Moisten the loop; grasp the leader and tippet tag on the left with your left hand, and the tippet and leader tag on the right with your right hand. Pull all four ends simultaneously to snug the knot tight. Trim tag ends.
THE IMPROVED CLINCH KNOT, TO CONNECT THE TIPPET TO THE FLY
The final knot in putting your tackle together is the Improved Clinch Knot, which we recommend for tying a fly to your tippet. The turtle knot is also good. Insert 5” to 6” of tippet through the hook eye. Make five turns with the tag end around the standing part of the tippet, winding away from the hook.
Push the tag end through the opening between the hook eye and the first wrap. This creates an open tippet loop over the wraps. Push the tag end through this open loop and pull slightly until the knot begins to close.
Moisten the knot area. Alternately pull on the standing portion of the tippet and the hook until the knot snugs up against the hook eye. Trim the tag end.
You have securely joined all the pieces of your tackle system – backing, line, leader, tippet and fly – and you have learned the basic knots of fly-fishing. The most important of these is the Improved Clinch Knot – the one you use to tie on your flies –because you will use it the most. So make sure you can do this one easily under any condition. Heavy winds, poor light and toughest of all, when that big fish is working the shallows!
EFFECTIVE KNOT-TYING
Few knots are 100% of the line’s rated strength but if you moisten all knots before drawing them tight, tighten them slowly, and test every knot by pulling on it – hard – you will reduce the chance for knot failures. Be sure to replace leaders, tippets and lines when they show wear or abrasion. Never discard used monofilament anywhere but in a trash receptacle or recycling bin.
FLY CASTING
With your balanced fly-fishing system in hand, there’s one more thing to consider before heading off to your favorite waters. It has often been said, “The worst time to practice casting is when you’re fishing.” The excitement of working on feeding fish makes it pretty tough for most of us to do our best casting, let alone think about practicing! So get instruction and practice before you get into the field. They are the keys to success.
Nieuwe Vliegenlijn
Je kent dat wel...je koopt een nieuwe vliegenlijn en hoe ga je nu te werk zodat hij goed van de spool afkomt. Of in veel gevallen is hij helemaal niet op een spool aangeleverd.
Ik kwam deze tip tegen;
''First take the fly line spool out of the box and unroll the line onto the floor. Stick a pencil in the hole of the spool and pull the line off with the other hand causing the spool to turn. If you lay the spool on a table and pull the line off the side you will end up with some nightmarish twists in your line. Make sure you do it the first way I mentioned. Spread the line out across the floor so that it does not tangle. Next give your line a good stretch to get all the coils out from being on the spool for a long time. Do this by working your way down the line from one end to the other.''
Als je nu geen vliegenlijn met spool hebt, maar een losse lijn, dan moet je helemaal voorzichtig te werk gaan om geen kluwe te veroorzaken. Rol de lijn heel rustig (neem de tijd) met 2 handen af op de grond en zorg dat je de ruimte neemt. Vervolgens de lijn weer even strekken zoals hier boven genoemd en de lijn is klaar om op te spoelen op de reel.
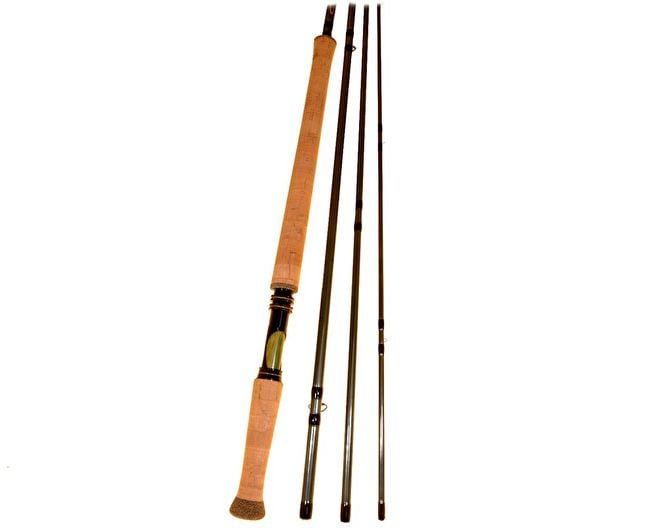
Set up a switch spey rod
Zeer informatief filmpje waarin deze mijnheer heel goed uitlegt hoe het zit met dubbelhandige hengels ten op zichte van enkelhandige hengels en ook hoe je ze eventueel kunt optuigen.
Fly Line WT Grain Chart
Dit is een handig rijtje getallen om uit te zoeken welke lijn er op je hengel kan om hem optimaal te laden en goed te kunnen werpen. Grammen naar grains omrekenen doe je met een factor 15,5. Dus weegt de 'head' 30ft 14 gram. Dan is dat dus 217 grains.
|
Number Designation |
Standard Weight |
Margin For Error |
|
1-Weight |
60 |
54-66 |
|
2-Weight |
80 |
74-86 |
|
3-Weight |
100 |
94-106 |
|
4-Weight |
120 |
114-126 |
|
5-Weight |
140 |
134-146 |
|
6-Weight |
160 |
152-168 |
|
7-Weight |
185 |
177-193 |
|
8-Weight |
210 |
202-218 |
|
9-Weight |
240 |
230-250 |
|
10-Weight |
280 |
270-290 |
|
11-Weight |
330 |
318-342 |
|
12-Weight |
380 |
368-392 |
|
13-Weight |
450 |
|
|
14-Weight |
500 |
|
|
15-Weight |
550 |
Here is a fly line wt chart that shows you the average grains of weight in the first 30 ft (or head of your line).
Understanding how the grains of wt differ from line to line can help you balance your favorite rod with your favorite line and do some damage in the salt.
Pay attention to the length of the head and how many grains of wt are in the head of your favorite salt water line. Knowing this will help you chose other lines in the future that will load your rod similar. This helps take some of the guessing out of whether or not certain lines will cast well on your favorite rod.

OPRUIMING!
Mooie aanbiedingen, grijp je kans! Op is op...
E10 Flyfishing
-Geen verzendkosten vanaf 50 euro!
-Direct uit voorraad
-Top Service
-Scherpe prijzen
-Niet goed?...geld terug!
-Kwaliteit & garantie
Mijn account
Inloggen
Wachtwoord vergeten?
Geen account?
Met een account kun je sneller bestellen en heb je een overzicht van je eerdere bestellingen.
Account aanmakenPaypal betaalt je retourkosten

Veilig betalen


Mis geen kortingscodes...
Schrijf je in voor de nieuwsbrief!
Geen verzendkosten vanaf € 50
*geldig voor bestellingen vanuit Nederland
Review plaatsen?
Stuur een mailtje naar info@e10-flyfishing.nl
Klant Reviews
Vandaag kwamen de door mij bestelde A.Jensen Pena en Newton reels binnen met de post. Het blijft altijd weer een feest om bij E10 op de site te shoppen...

